




1:60
scale

18
Altersempfehlung

7000
Einzelteile
Cutty Sark Brick System
Art. Nr. 009649090
pre-order now - item available late November 2026
1:60
scale
18
Altersempfehlung
7000
Einzelteile
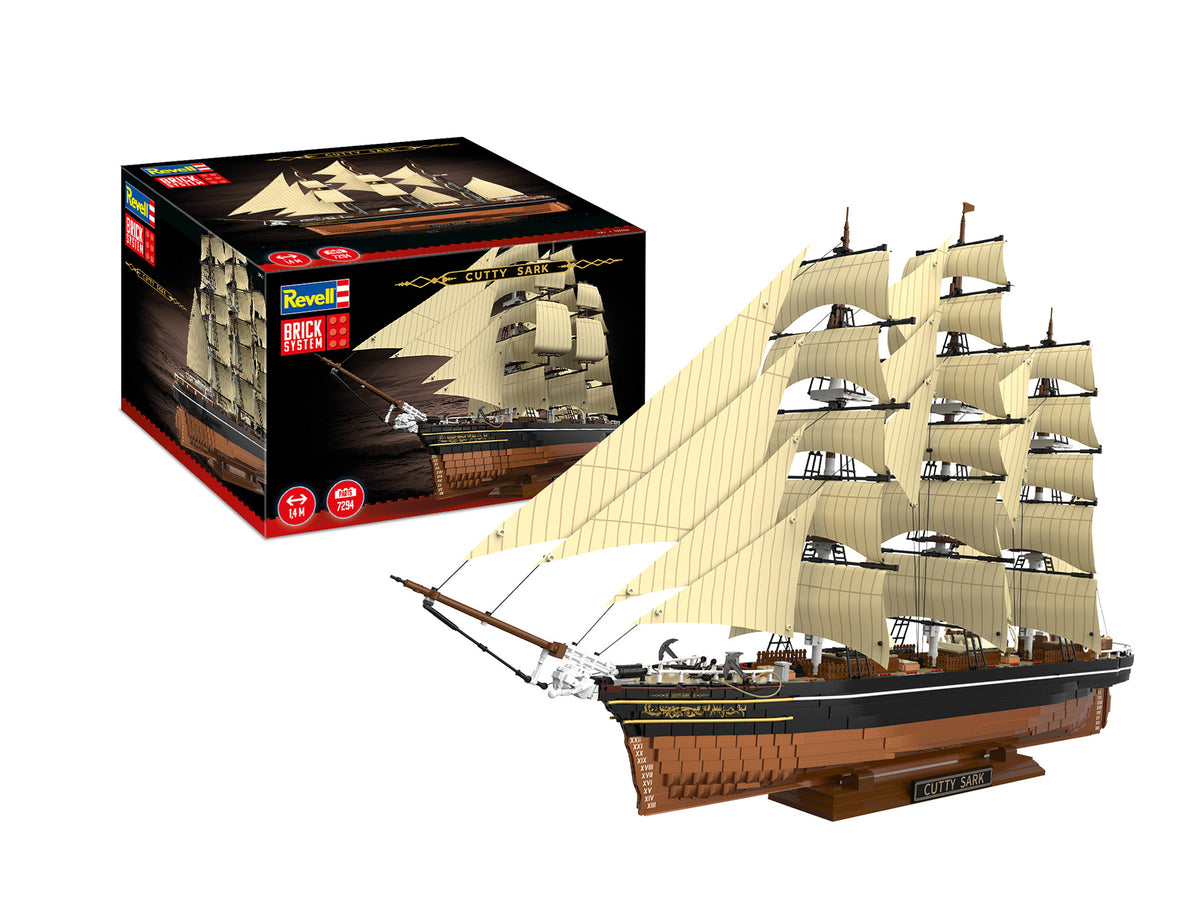
Revell Cutty Sark Brick System – Building Block Tea Clipper
With the Cutty Sark - Brick System from Revell, you can bring the 1869 British tea clipper onto your workbench as a detailed modular model. The set completely eschews stickers, opting instead for printed bricks and printed sails. If you appreciate maritime history and enjoy challenging construction phases, this building block model offers hours of focused engagement while you assemble the hull, deck structures, and rigging.
Historic Tea Clipper as a Building Block Model
Built in Dumbarton, Scotland, in 1869, the Cutty Sark is one of the most famous sailing ships in maritime history. Engineered for rapid tea transport from Shanghai to London, every knot of speed mattered for this ship type. Clippers had to optimally utilize the trade winds and survive heavy seas in the Southern Ocean to bring the season's first tea shipments to the London markets. Later, the Cutty Sark sailed in the arduous wool trade between Sydney and England, where it regularly set speed records. The Revell Brick System model translates this historic three-masted ship into a kit that captures the sharp lines of the hull using classic building blocks.
During assembly, you experience the proportions of a real clipper directly with your hands. While standard 19th-century cargo sailing ships were often bulbous to offer maximum cargo space, the Cutty Sark was characterized by an extremely long, narrow bow and a razor-sharp stem. The set captures these design features by using special molded parts and flat tiles to trace the hull's curves. You assemble the underwater hull layer by layer, attach the keel, and build up the sides until the typical silhouette of the record-breaking sailing ship stands on your assembly table.
The assembly requires no tools such as glue or paint. The components interlock with precise clamping force. As a result, the structure remains adjustable throughout the entire creation process. Should you place a piece incorrectly inside the hull, you can release the connection by hand or with a brick separator and re-attach the section. This flexibility distinguishes the Brick System from conventional plastic model kits, while the finished state still achieves the visual cohesion of a display model.
No Stickers: High-Quality Prints on Bricks and Sails
A central design feature of this kit is the consistent avoidance of paper or foil stickers. All graphic details, markings, and decorative elements are printed directly onto the plastic parts. With many modular kits, stickers lead to unsightly problems after a few months or years in the light: edges peel off, dust collects on sticky margins, or the foils bleach unevenly. With the Cutty Sark in the Brick System, all markings remain firmly bonded to the plastic, ensuring the surface looks permanently clean.
Pad printing is utilized at several key points on the ship:
- Nameplate and decorations: The ship's name at the stern as well as the decorative trim and typical ornaments of the original are precisely printed onto the hull elements.
- Printed sails: The fabric sails or stylized sail components included in the set feature fine prints that replicate the grain, reef bands, and seams of historic sailcloth. You do not need to cut or apply any foils.
- Deck elements and markings: Deckhouses, signs on deck structures, and markings on crates or hatch covers are factory-printed.
- Display plaque: The plaque on the model stand, which shows ship data and the year of construction, consists of a cleanly printed brick with high-contrast lettering.
Thanks to the printing technique, the components have a uniform feel. You don't have to worry about crooked stickers when placing tiles. Even with repeated handling or occasional dusting of the finished model, the printed image remains undamaged on the surface.
Construction of Hull, Deck, and Superstructure
In the original, the clipper's hull was built using a so-called composite construction: iron frames supported planking made of teak and pitch pine. The underwater hull was clad in Muntz metal, an alloy of copper and zinc that protected the wood from shipworms and inhibited algae growth. The model reflects this duality through its coloring. The upper hull section is finished in matte black, while the underwater hull captures the reddish-gold tone of the copper plating.
The installation of the decks occurs in several sections. On the supporting hull frames, you lay plates and tiles that simulate the wooden weather deck. This creates a textured surface where studs for functional elements and smooth tile areas alternate. On this base deck, you place the crew's workstations:
- Deckhouses: The crew's quarters and galley are created as compact block structures with indicated doors, windows, and ventilation hoods.
- Cargo hatches: Large hatch covers mark the entrances to the holds where tea crates and wool bales were once stowed.
- Winches and capstans: Anchor winches on the forecastle and capstans along the deck illustrate the muscle power required to operate the heavy ropes and chains.
- Lifeboats: Small dinghies are stored on separate davits and supports above the deck to keep the workspace for the sailors clear.
- Helm: At the stern, you assemble the deckhouse and the steering wheel, which sits directly above the rudder shaft and controlled the clipper's direction.
The anchor system at the bow is equipped with molded parts for the heavy stock anchors. Through chain elements, the anchors are connected to the hawseholes in the ship's hull. Because of this wealth of detail, your eyes will frequently linger on small mechanical assemblies on the finished model.
The Three-Masted Full-Rigged Ship and the Rigging
The Cutty Sark carried the rigging of a full-rigged ship, meaning all three masts—the foremast, mainmast, and mizzenmast—were completely equipped with square sails. In this kit, the rigging forms the most challenging construction phase. You build the lower masts on solid base bricks, which are anchored deep in the hull. This is followed by topmasts and topgallant masts, which taper towards the top. Several crossbeams are mounted on each mast: the lower yard, lower topsail yard, upper topsail yard, lower topgallant yard, upper topgallant yard, and royal or sky yard.
Tensioning the rigging requires concentration and calm. Included in the scope of delivery are rigging threads and pre-formed shroud parts, with which you attach the standing and running rigging:
- Shrouds and backstays: They stabilize the masts laterally and aft against wind pressure. The ladder-like knit patterns of the shrouds also serve as climbing rungs for the model sailors.
- Stays: Threads that run diagonally from the mast tops forward to the bowsprit and jib boom absorb the forces in the longitudinal direction.
- Printed square sails: The sails are hung on the yards and fixed with slight curves to create the impression that the ship is at sea with full wind.
- Bowsprit and jib boom: The long projection at the bow extends the rigging line and accommodates the triangular headsails, which gave the clipper course stability.
When aligning the ropes, even tension is crucial. If you pull a rope too tight, the mast will tilt; if it remains too loose, the rigging will sag. You work your way step by step from the inside out and from the bottom up through the rig. This construction progress provides a deep understanding of how the complex rigging of historic large sailing ships functioned mechanically.
Target Audience and Suitability of the Kit
The Revell Brick System Cutty Sark model is aimed at model-building enthusiasts aged 12 and up, as well as adult building block builders. Due to the combination of many individual parts, delicate strings, and the need for symmetrical alignment, the model is suitable for those who enjoy multi-hour construction projects. It is not a toy for quick maneuvers in a child's room, but a static collector's model with technical requirements.
The kit appeals to the following target groups:
- Historically interested model builders: Anyone enthusiastic about shipbuilding history, the era of clippers, and 19th-century maritime sailing will find a scale-accurate representation here.
- Building block fans: Experienced builders who are looking for challenging assembly techniques and builds beyond pure house or vehicle facades.
- Ship model collectors: Fans of maritime decor who shy away from the time commitment of wooden or plastic model kits including painting, but appreciate the look of a rigged clipper.
For the build, you need a tidy table with sufficient work surface. A small bowl for sorting small assembly elements and fine tweezers for threading the rigging lines are useful aids, even if the modular system fundamentally requires no special tools.
The Display Stand for Cabinet and Shelf
A clipper hull is hydrodynamically shaped and has a narrow keel. Without support, such a ship model cannot stand upright. Revell therefore includes a specially designed model stand with the kit, which you assemble from sturdy building blocks at the start of the construction project.
The base consists of dark bricks and features two holding blocks, which are precisely adapted to the hull curves. As soon as the keel segment is completed, you can place the growing ship directly into the stand. This makes the assembly of the decks and masts much easier, as the model cannot tip over during work. The printed nameplate with the construction data is mounted on the front of the stand. The finished ship stands perfectly level and stable, making it safe to display on shelves, sideboards, or in closed glass cabinets.
Step by Step through the Modular Assembly Instructions
A printed, color-illustrated instruction manual is included with the set. It divides the entire project into logical construction phases, each supported by separate parts bags. This means you don't have to search through hundreds of bricks at once, but always focus on the current segment.
The construction phases are divided as follows:
- Construction Phase 1 – Keel and frame structure: First, you build the inner backbone out of durable construction bricks. This creates the stability that later absorbs the tension of the masts.
- Construction Phase 2 – Hull planking: The side walls are closed with molded parts and smooth bricks. Black and copper-colored bricks alternate here.
- Construction Phase 3 – Deck construction: The deck plates are inserted, followed by hatches, railings, deckhouses, winches, and the bowsprit.
- Construction Phase 4 – Masts and yards: Foremast, mainmast, and mizzenmast are erected, fitted with platforms, and equipped with the cross-timbers.
- Construction Phase 5 – Sails and rigging: The printed sails are attached and tensioned with the rigging threads, secured, and knotted.
- Construction Phase 6 – Final assembly: Smaller fittings, anchors, and the nameplate are completed.
In the drawings, newly added bricks are highlighted in color or marked with clear arrow lines. This allows stud distances to be counted error-free. If you still make a mistake, you will usually recognize it in the next construction step, as the subsequent plates provide a clear locking position.
Technical Specifications
| Product Name | Cutty Sark - Brick System |
| Manufacturer | Revell |
| Product Type | Building Block Model Kit |
| Historical Reference | British tea clipper Cutty Sark (built 1869) |
| Ship Type | Three-masted full-rigged ship |
| Decoration / Inscription | Printed parts only (no stickers) |
| Sail Design | Printed sailcloth with seam and reef details |
| Connection Technique | Classic clamping force (plug-in system without glue) |
| Compatibility | Compatible with standard building blocks from common systems |
| Base Stand | Includes display stand with printed nameplate |
| Age Recommendation | 12 years and up |
Frequently Asked Questions about Revell Cutty Sark Brick System – Building Block Tea Clipper
Are there stickers included in the kit?
No, the kit comes completely without stickers. All ornaments, the ship's name, the details on the deck structures, and the inscription on the base plaque are printed directly onto the bricks. The included sails are also already printed with fine structures, so no edges can peel off over time.
Do I need glue or paint for the assembly?
For the construction of the Cutty Sark in the Brick System, you need neither glue nor paint. All parts hold together mechanically through clamping force and already have the appropriate colors ex-works, including the typical black for the hull and copper colors for the underwater hull. The model can also be dismantled if necessary.
How stable is the finished model on flat surfaces?
The set contains a custom-fit display stand made of black building blocks. This stand securely supports the round keel at two contact points. As a result, the finished large sailing ship model stands securely and perfectly level on shelves or desks.
How is the ship's rigging mounted?
The model comes with rigging threads and pre-formed shroud parts. After erecting the masts and yards, you thread the strings step by step according to the instructions through the anchor points and knot them. Tweezers make it easier to guide the ropes in the narrower mast sections.
Responsible person:
Carrera Revell Europe GmbH
Henschelstrasse 20-30
32257 frets
Germany
Telephone: +49 5223 965-0
Email: info.de@carrera-raevell.com
Frequently asked questions
Didn't find the right answer in the FAQ or would you like to find out more about our products? Ours Customer service is at your side with advice and support – quickly, competently and personally. No matter whether technical details, spare parts or usage tips: we are there for you.
24/7 support
Telephone
For beginners, Revell models with skill level 1 or 2 are recommended. Level 1 includes simple plug-in kits without glue, while level 2 requires basic gluing work. These models have fewer components (usually 20-50 parts) and simple color schemes. Experienced model makers should only start at level 3, as this already requires detailed painting and precise gluing work.
The packaging colors show a basic painting for quick results. However, the construction instructions contain detailed color recommendations for authentic, true-to-scale replicas. Professional model makers use the instructions' extended color palette for more realistic results. This enables both beginners to create simple projects and experts to create detailed replicas.
Revell releases new models and new editions of classic kits every month. Around 60-80 new products are released every year, including airplanes, ships, cars and RC models. The list of new products is updated at the beginning of each month. Collectors and enthusiasts should check the Revell webshop regularly, as limited editions often sell out quickly.
Revell invests significantly in product development, precise injection molds and detailed construction instructions. Each model goes through extensive design processes, tool making and quality control according to the EN 71.5 standard. The higher costs result from licensed original artwork, multilingual instructions and the use of high-quality plastics that enable precise details.
You can obtain spare parts for Revell models from official customer service or authorized dealers. Many parts can be reordered individually, although an exact kit number is required. Alternatively, specialized model building communities offer exchanges. For older, no longer produced models, 3D printing services or aftermarket manufacturers can often help.
The basic equipment includes plastic glue, side cutters, files, basic paints (black, white, gray) and brushes of various sizes. Primer, clear coat and detail brushes are recommended for advanced projects. A cutting mat set and good lighting significantly improve the quality of work. Budget beginners can start well with around 50-80 euros.
Revell RC models are differentiated according to age groups. Ready-to-run models are suitable for ages 8 and up, while kit RC models require experience in model building. Adults benefit from expandable systems and tuning options. The skill level marking helps with selection - RC beginners should start with levels 1-2, even as adults.
The Revell range includes over 400 active models, which is challenging for small retailers in terms of inventory and finances. Specialist retailers tend to focus on popular categories or regional preferences. The official Revell web shop offers the full range, while local dealers often allow special orders. Remaining stocks of older models can often be found in specialized model making shops.
We accept product suggestions via the contact form on the website. Successful proposals take into account market potential, licensability and technical feasibility. Keep in mind that developing new models takes 12-24 months. Detailed suggestions with reference material have a higher chance of success, but due to the high volume, not all ideas can be implemented.
All Revell products comply with the European toy standard and are regularly tested for harmful substances. Safety instructions in the construction instructions are mandatory and particularly concern adhesives and paints. Models below skill level 3 are designed for children aged 10 and over, higher levels require supervision or are only recommended for children aged 14 and over. The CE marking confirms conformity.